· 6 min read

Understanding RAG: From First Principles

Learn how Retrieval-Augmented Generation solves the LLM context problem. Explore chunking, embeddings, vector databases, and semantic search from first principles.

The Problem: The Context Wall

If you have ever tried to learn AI API programming, you must have heard about the notorious problem of context. LLMs are incredibly smart, but they are essentially “frozen” in time based on their training data. They don’t know your specific business data, your internal documents, or your latest user logs.

When first encountering this wall, it is common to hear about fine-tuning the model as the ultimate fix. But let’s be honest, fine-tuning comes with massive headaches:

  • It is incredibly hard to manage.
  • It is expensive to set up.
  • It is a nightmare to sustain as your data keeps changing.

So, how is this solved? The answer is a concept called RAG. Let’s talk about what RAG is in the simplest way possible, and eventually take it to the next level.

Breaking Down RAG (Retrieval-Augmented Generation)

At their core, LLMs are just generating the most probable next word. They are essentially predicting similar text based on what they have seen. There is a saying in the AI world that the better and more specific the input (the prompt), the more accurate the results will be.

In order to educate the LLM about specific interests and provide context, it is necessary to provide a highly specific prompt that includes the relevant information needed to find the best answer.

At its most basic level, this is RAG. Business information is stored and then concatenated into the prompt, giving the LLM the exact context it needs to answer.
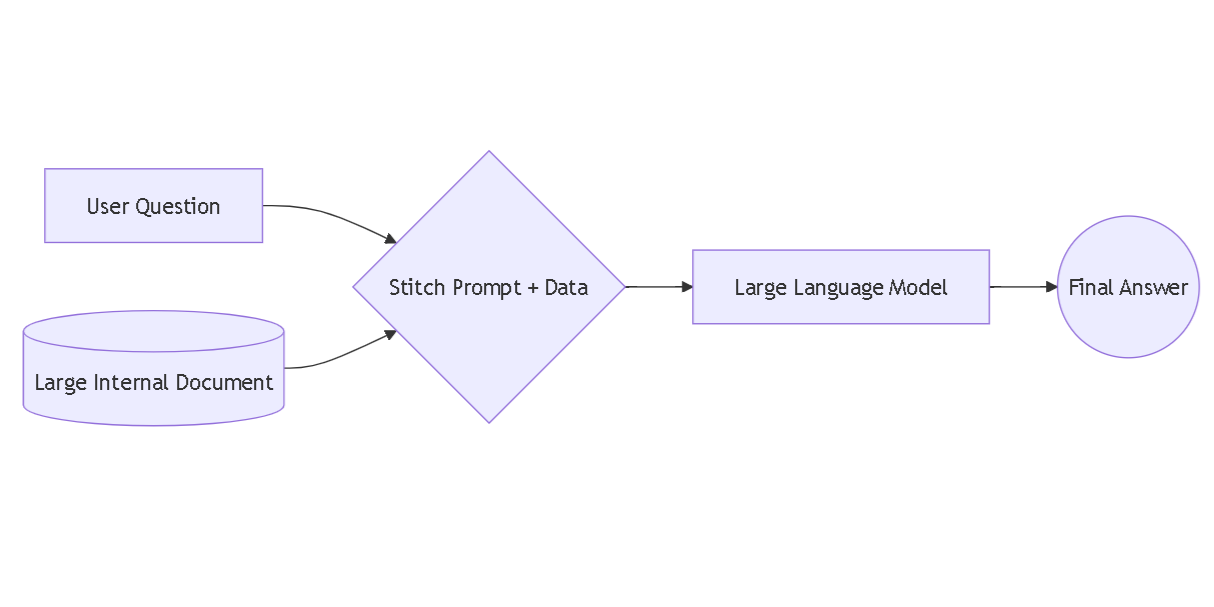
User prompt and document merging into a single prompt for LLM
Basic RAG concept: Merging user prompt with relevant documents

But it is not that simple. Let’s look at the problems in this approach, one by one, and see how to solve them.

Problem 1: The Giant Text File

Imagine storing all business info in a text doc and providing it to the AI inside the prompt. Passing a 2 GB text file to an LLM every time a question is asked simply won’t work.

LLMs have a strict limit on how much data they can process at one time. This isn’t about how many parameters were used to train the model; it is about the “short-term memory,” which is called the context window.

Since it is impossible to give all the data to the LLM at once, there needs to be a way to manage data and only provide the specific part that is relevant at the exact moment of the query.

Solution 1: Let’s Chunk It

Let’s think from first principles. The size of the text data is way too large. What can be done to decrease it?

One idea is to compress it by eliminating repeated words or summarizing. However, this introduces risks:

  • It might change the core meaning of some sentences.
  • It might introduce false truths to the LLM.
  • It guarantees the LLM will not answer properly.

So, let’s try something else. Most of the time, a large block of text talks continuously about a specific subject. What if this massive log of data is broken into smaller planks? For example, a large text containing 1,000 words could be broken into 5 chunks of 200 words each.
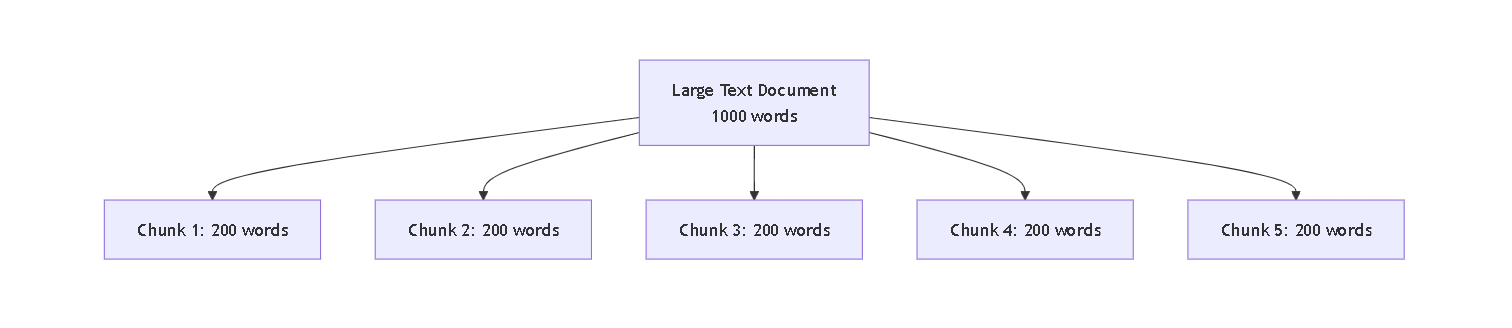
Large text document being sliced into smaller equal-sized chunks
Text chunking: Breaking large documents into manageable pieces

But now there is a new question. How is it possible to know which 200-word chunk is the most relevant to the prompt at any given moment?

Problem 2: Finding the Right Chunk

One way is to put something like topic tags or names on these planks. A map could be created that says, “This topic is related to this specific piece of text.” Then, when a prompt is provided, the system checks which topic matches best and attaches only that chunk to the prompt.

This is a much better position to be in. The text size is reduced drastically and relevant context is attached. But it is still not the best approach. What if the chunk picked did not contain all the info on the topic? Context might be missed entirely.

To solve this, the strategy can be improved:

  • Increase the chunks: Retrieve the top k (top 3 or 5) relevant chunks instead of one.
  • Add overlapping: Overlap chunks by a few words so context isn’t lost in a hard slice.

Problem 3: Scalability

This is a better state than the last one, but let’s look at scalability.

Chunking all the text, manually assigning tags, storing them separately, and managing the overlaps will get messy. Plus, searching through manual tags every time a question is asked is not the most reliable way because tags might not even be assigned properly.

So, how is this finally solved for real?

This is where the magic of vectorization, embeddings, vector databases, and semantic search comes in. Let’s break them down.

Vectorization and Embeddings

Imagine a massive, multi-dimensional space. Vectorization is the process of converting text chunks into numbers (coordinates) and placing them in this space. These numerical representations are called embeddings. The cool part is that the math places concepts with similar meanings closer to each other, keeping relationships intact. For example, the mathematical distance between “India” and “Delhi” will be very similar to the distance between “China” and “Beijing”. This gives the computer a way to actually understand relationships.
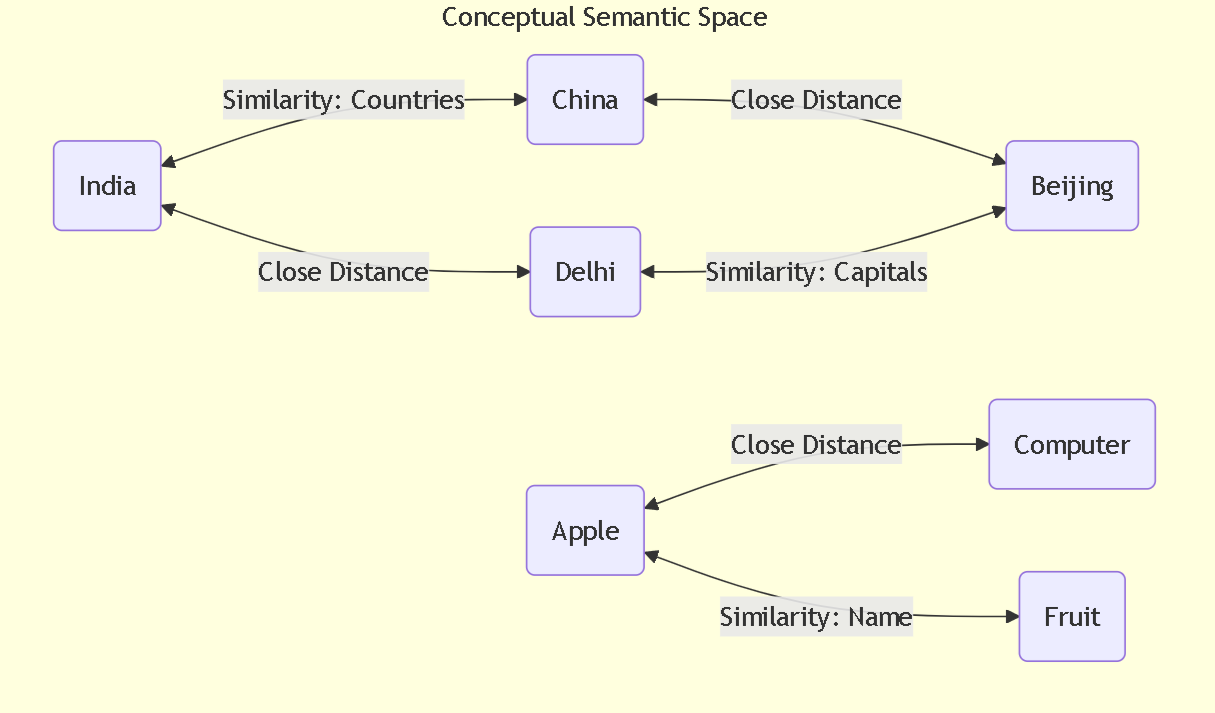
3D scatter plot showing text concepts as dots with similar meanings close together
Vector embeddings: Similar concepts cluster together in semantic space

Vector Databases

Since standard databases are not built to handle massive lists of multi-dimensional coordinates, Vector Databases are used instead. They are specifically built to store these embeddings and search through them incredibly fast.

Instead of searching for exact keyword matches or manual tags, semantic search looks at the meaning of the prompt. It converts the prompt into an embedding, drops it into that multi-dimensional space, and gathers the text chunks that are physically closest to it.

The Standard RAG Cycle

What does a standard, basic RAG setup actually look like in practice? It is a simple cycle:

  • Prep the data: Chunk data, convert to embeddings, and save in a Vector DB.
  • The User Prompt: The system receives the user’s question.
  • Search: Embed the question to run a semantic search for top k text chunks.
  • Augment: Gather the relevant chunks and stitch them into the prompt.
  • Generate: Send the contextual prompt to the LLM for a highly accurate response.
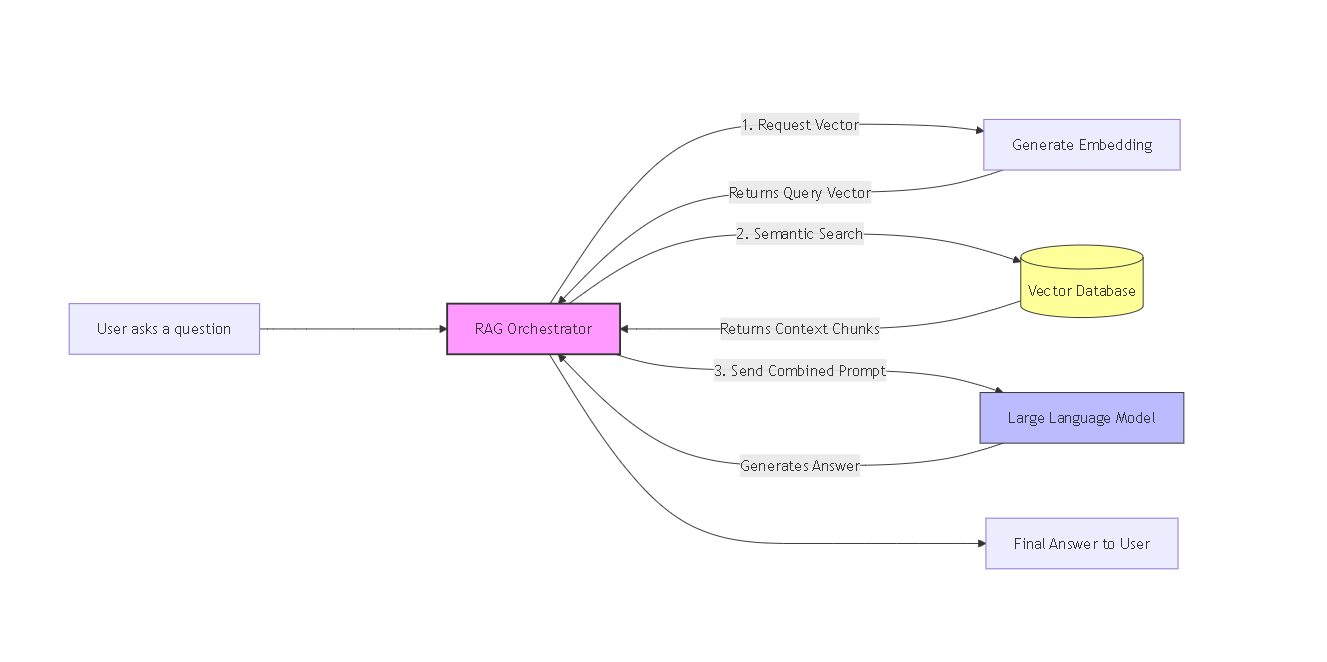
Complete RAG workflow showing document processing through LLM output
Complete RAG cycle

Wrapping Up

This cycle is the most basic, foundational version of RAG. It works wonders for standard text.

But what happens when it gets complex? Over time, it becomes clear that some data is not easily chunkable. Take legal documents for example. They are full of external references, cross-sections, and complex clauses that break if they are just chopped up into 200-word blocks.

How is that tackled? Well, that requires some advanced RAG techniques, but I might discuss those in a future blog.
· 5 min read

Making Tura: Building a Peer-to-Peer File Transfer CLI

Tura is a peer-to-peer file transfer CLI built with Rust. In this blog post, I will share my journey of creating Tura, the challenges I faced, and the lessons I learned along the way.

Why I built Tura

I have always been a fan of croc. It is a great tool that just works when you need to send files between computers. Using it so much got me thinking about how it actually handles those transfers under the hood. I decided I wanted to build my own version, a peer-to-peer CLI file transfer tool I named Tura.

This is how it went, what I tried first, what completely failed, and how the architecture slowly changed.

The First Try: Direct Connections

The first idea was simple. Just do peer-to-peer.

My computer should directly connect to your computer. No server in between. That feels like the “correct” way to do it.

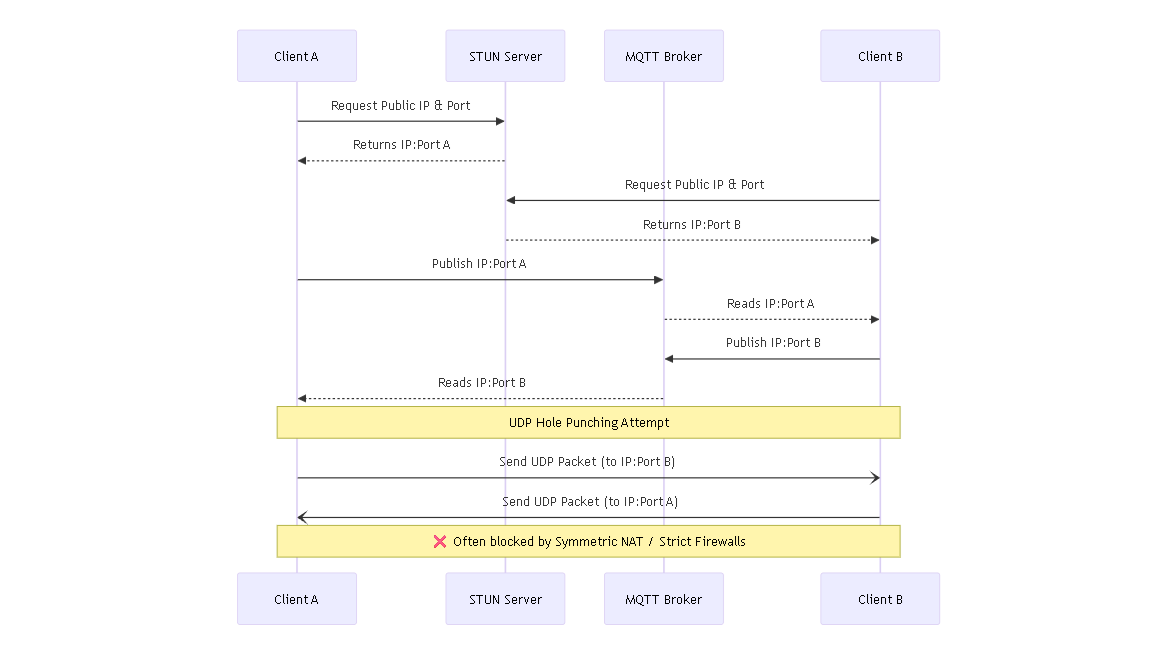
The problem is routers. Our computers only know their local IP address, not the public one because of NAT (Network Address Translation). To find these, I used STUN. Both clients would hit a STUN server and get their public IP and the port their router exposed.

Now both sides had this info, but they still needed to exchange it. For that, I used MQTT since it is lightweight and easy for this kind of signaling.

So the flow became:

  • both clients get public IP + port via STUN
  • they publish it on an MQTT topic
  • the other side reads it

Once both sides had each other’s info, they would try UDP hole punching.

STUN and MQTT signaling with UDP hole punching
STUN + MQTT + UDP hole punching flow

On paper, this looked really nice.

In reality, it broke instantly.

Different networks behave very differently. Some routers use Symmetric NAT, where the port changes for every connection. So the port you shared becomes useless almost immediately.

On top of that, strict firewalls just drop unknown UDP packets entirely.

So sometimes it worked, sometimes it did not. Mostly it did not.

At that point it was clear: this approach is unreliable in real-world conditions. I had to drop it.

The Pivot: Using a TCP Relay

Since direct connections were not reliable, I needed a fallback that always works.

That is when I looked back at croc and realized they use a relay server when needed.

So I switched to that approach.

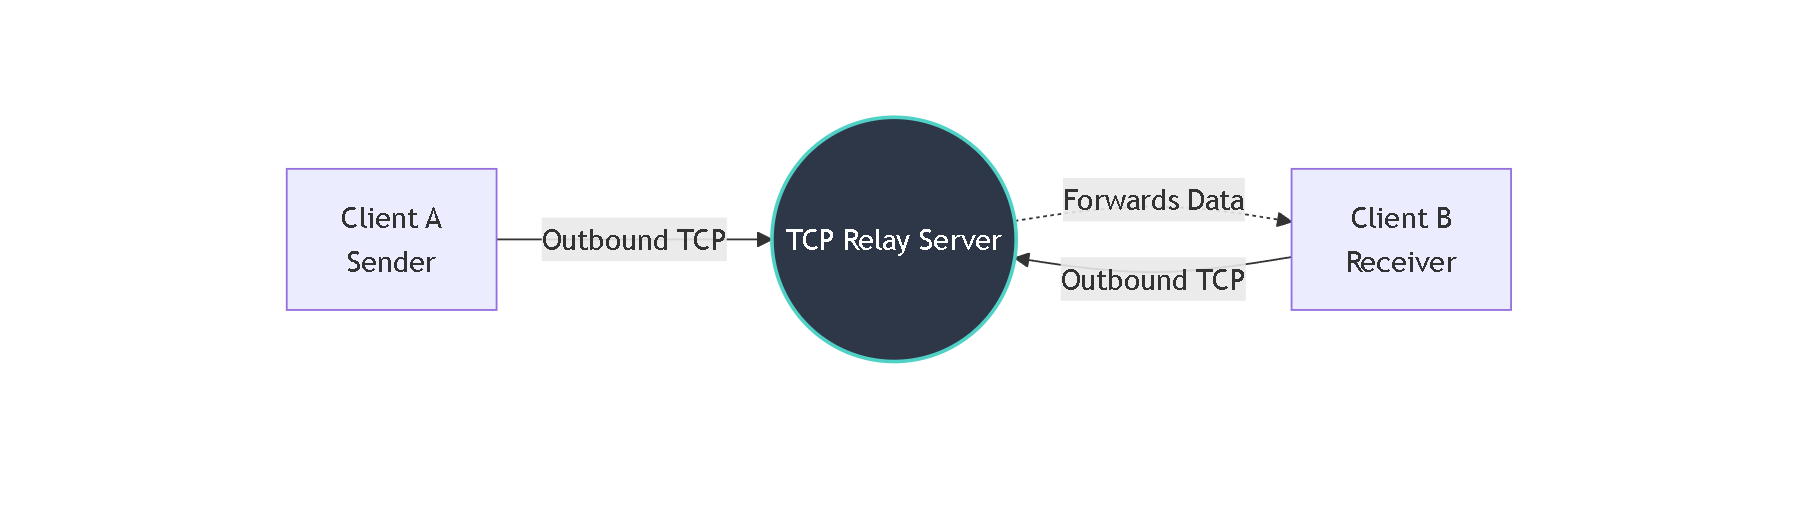
Instead of trying to connect to each other, both clients connect to a central TCP relay server.

Outbound connections are almost always allowed by routers, so this works consistently.

Once both clients are connected, the relay does not do anything fancy. It just forwards data from sender to receiver.

TCP relay architecture where two clients connect through a relay
TCP relay architecture (Client → Relay → Client)

Finally, I was able to send a file successfully from one machine to another without random failures.

That was a big milestone.

The Speed Issue: Chunking the Data

Now that the connection was stable, the next problem was actually transferring files efficiently.

You cannot just dump a large file into a socket in one go. It needs to be broken into smaller pieces.

I chose 64KB chunks (buckets).

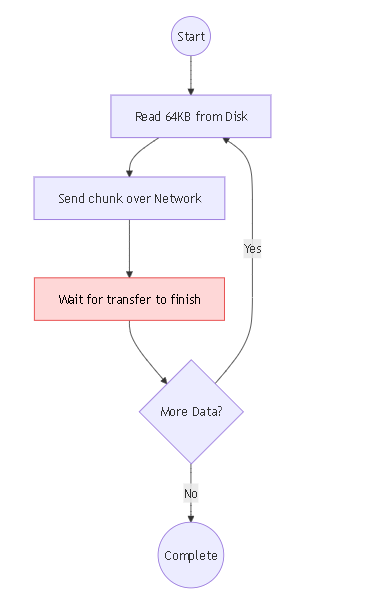
The flow was:

  • read 64KB from disk
  • send it over the network
  • wait for it to finish
  • repeat

On the receiving side:

  • read incoming chunks
  • write them to disk
Sequential read send wait chunk flow
Sequential chunk flow (Read → Send → Wait)

This worked fine in terms of correctness.

But performance was bad.

I was getting around 500KB/s to 1MB/s, which is way too slow.

The issue was the flow itself. Everything was sequential.

While reading from disk, the network was idle.

While sending data, disk was idle.

So even though both components were fast individually, they were not being used efficiently together.

Fixing the Bottleneck: Multithreading

To fix this, I needed concurrency.

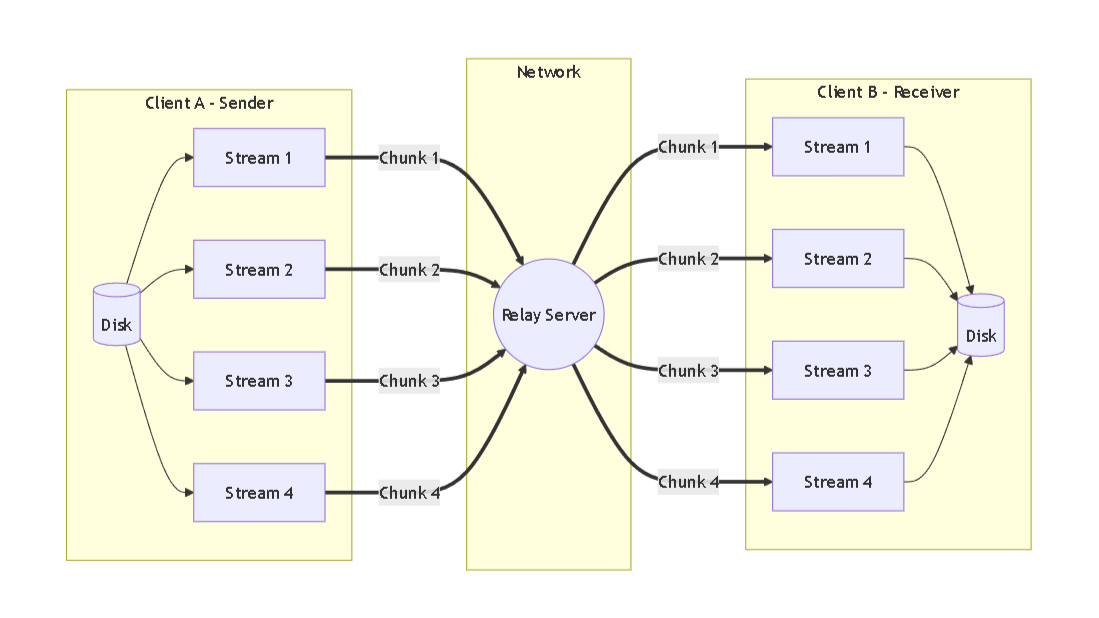
Instead of a single stream handling the entire file, I split the work across multiple threads.

I divided the file into parts and started 4 parallel streams. Each thread handled its own chunk of the file independently: reading, sending, everything.

Parallel chunk transfer with multiple worker threads
Parallel chunk transfer with multiple threads

Now things started to improve.

Disk and network were both being used continuously instead of waiting on each other.

The difference was huge.

When I ran the relay server locally on my own machine, the transfer speed went up to around 1GB/s.

To test it in a more realistic setup, I exposed the server using a tunneling tool and asked a friend to try it.

We got around 4 to 5MB/s consistently.

That drop was not because of my system. It was the limitation of the free tunneling service.

So at this point, performance-wise, things were in a good place.

Securing the Transfer

Now came the security part.

Since all data was going through the relay server, it could technically read everything being transferred. That did not feel right.

So I added end-to-end encryption.

I used the chacha20poly1305 crate, which is a well-known and reliable encryption method.

This changed the pipeline a bit.

Before sending each chunk:

  • data gets encrypted using a shared key
End-to-end encryption flow through a relay
Encryption flow (Encrypt → Relay → Decrypt)

The relay server just forwards encrypted data, which looks like random bytes.

On the receiving side:

  • data is decrypted before writing to disk

So even though the relay is in the middle, it has no idea what is being transferred.

The Cost of Encryption

Encryption solved the privacy issue, but it came with a cost.

Every chunk now had to go through encryption before sending and decryption after receiving.

When I tested locally again:

  • speed dropped from ~1GB/s to ~500 to 600MB/s

The CPU was the bottleneck this time.

I tried optimizing by increasing chunk size so fewer encryption calls would happen.

But that created new problems:

  • memory usage increased a lot
  • network handling became messy

So I went back to 64KB chunks.

At that point, it felt like the right balance.

Even with the drop, 500MB/s is still very fast, and the added security is worth it.

Conclusion

Building Tura helped me understand a lot of things.

Direct peer-to-peer sounds ideal, but real-world networks make it unreliable. That is why relay-based systems are so common.

I also saw how much difference concurrency makes, and how encryption introduces real tradeoffs with performance.

A lot of this was trial and error. Things broke multiple times before working properly.

But that is honestly the best part of building something like this.

Github

https://github.com/starz099/tura

· 3 min read

URL as a Skill

Using the URL bar intentionally can make navigating the web faster and smarter. These are a few insights I picked up about URLs while building and using web apps.

I rarely see the GitHub homepage.

If I want a repo, I type the repo URL. If I want a profile, I type the profile URL. If I want issues or pull requests, I just change the last part of the URL.

No clicking through the UI. No menus. Just the URL bar.

At some point I noticed something interesting. The more time you spend online, the more the URL bar starts feeling less like a place where you type websites and more like a navigation tool.

When you start noticing patterns

When you first use a website, you rely completely on the interface.

  • Click the button.
  • Open the menu.
  • Follow links.

But after using the same site for a while, patterns start appearing. GitHub is a simple example.

github.com/{username}
github.com/{username}/{repo}
github.com/{user}/{repo}/issues
github.com/{user}/{repo}/pulls

If you are on /issues and want pull requests, you can just change it to /pulls. No navigation needed.

More Examples

Going directly to problems on LeetCode

On coding platforms like LeetCode, I rarely open the homepage anymore.

leetcode.com/problems/{problem-name}
leetcode.com/problems/{problem-name}/submissions/
leetcode.com/u/{username}

Once you know the structure, you can jump directly to where you want to go.

Switching between Google accounts

Google services follow a similar pattern. For example in Gmail, the number after /u/ represents the account index.

https://mail.google.com/mail/u/0/#inbox
https://mail.google.com/mail/u/1/#inbox
https://mail.google.com/mail/u/2/#inbox

Changing that number switches the account instantly. Works across many Google products.

Jumping to a specific video moment

YouTube links support timestamps using the t query parameter.

youtube.com/watch?v=VIDEO_ID&t=300

This opens the video at 300 seconds. People often share links like this when pointing to a specific part of a video.

Finding any npm package

npm works the same way. Once you know the URL pattern, you never really need to search the homepage.

npmjs.com/package/{package-name}
npmjs.com/package/react
npmjs.com/package/tailwindcss

Vercel preview deploys

Vercel preview deployments are another good example.

Every pull request gets its own predictable preview URL. You can open it directly, share it, or test it without navigating the dashboard.

Production, staging, preview builds. Each environment has its own URL. The URL itself is already telling you where you are.

Slugs: readable URLs for content pages

You are reading this blog at /blog/url-as-a-skill. That last part is called a slug.

A slug is basically a URL-friendly version of a title.

"URL as a Skill"  →  url-as-a-skill
"My First Post"   →  my-first-post
"What is Next.js" →  what-is-next-js

The rules are pretty simple:

  • Lowercase everything.
  • Replace spaces with hyphens.
  • Remove special characters.

Slugs make URLs readable and shareable. They also help with SEO because search engines understand the words in the path.

/blog?id=f3a92c          ← tells you nothing
/blog/url-as-a-skill    ← tells you exactly what it is

Most modern frameworks like Next.js use file-based routing, where the folder name literally becomes the slug.

Why this actually matters

  1. It is faster than navigating through menus.
  2. You start noticing route patterns like /users /repos /issues /settings.
  3. It also helps when building webapps because routing in React, Next.js, or Express follows the same idea.

How to develop this habit

  • Pay attention to the address bar when moving between pages.
  • Notice path changes like /issues to /pulls.
  • Try editing URLs manually and see what happens.
  • Watch for common paths like /profile /dashboard /settings /docs /api /admin.

The URL bar is the command line of the web.